
Achilles pain with running is a very common problem. It is often referred to as Achilles tendinitis. This term is a little outdated now and the more correct term would be Achilles tendinopathy. In Part One of this series on Tendinopathy we discussed the underlying pathology (disease process). In Part Two we learned how thinking about tendinopathy rehabilitation has evolved over the last 20 years or so. In that article we discussed how loading seems to be the most effective strategy for tendon rehabilitation at present. In this article we are going to discuss Achilles tendinopathy treatment specifically. We’ll start by describing 4 phases of rehabilitation and how to decide which one you need to be in. We’ll also talk about whether it is okay to keep running with Achilles pain and then we’ll bring it all together in a nice little treatment program summary at the end.
How to Treat Achilles Pain with Running
As we discussed in Part Two, loading is our key treatment for tendinopathy. We are going to use loading exercises to effectively strengthen the tendon so that it is able to tolerate more load. When I say load or loading I am referring to any movement or exercise that places stress on the tendon. In the case of the Achilles tendon, when we sit in a chair or lie on a bed the Achilles is completely unloaded. When we walk the calf muscle contracts to pull the calcaneus (heel bone) upwards to propel us forward, loading the Achilles tendon as force is generated.
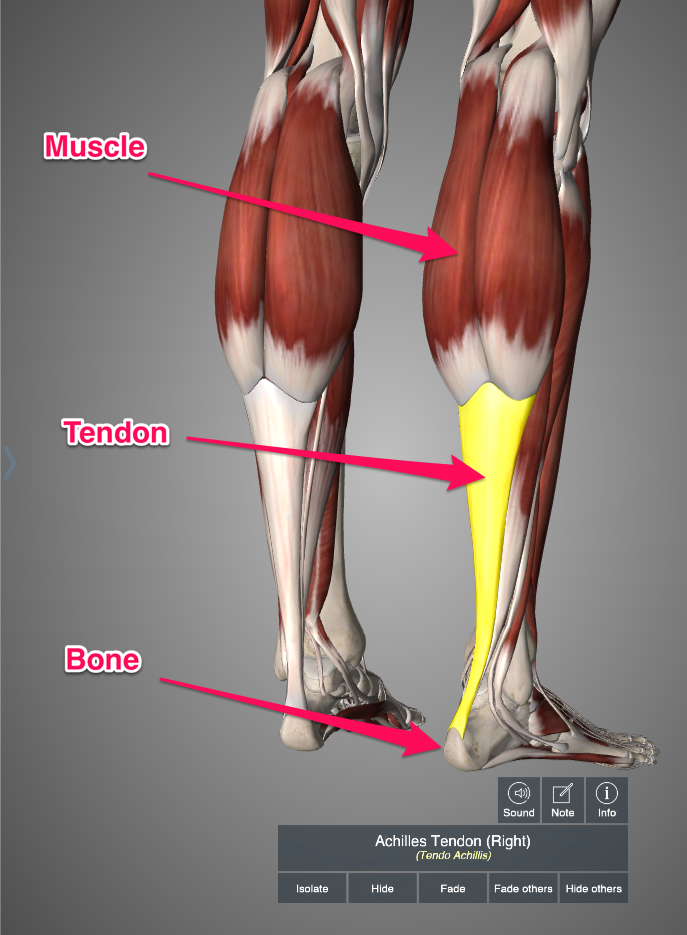
Loading exercises are simply different ways of loading the Achilles tendon by asking the calf muscle to generate force. The exercises we use to treat Achilles tendinopathy are usually some form of calf raise (heel drops) and jumping. The trick is to determine how much load you need to put on your Achilles depending on your current state. To help us do this we can use my Tendon Loading Spectrum.
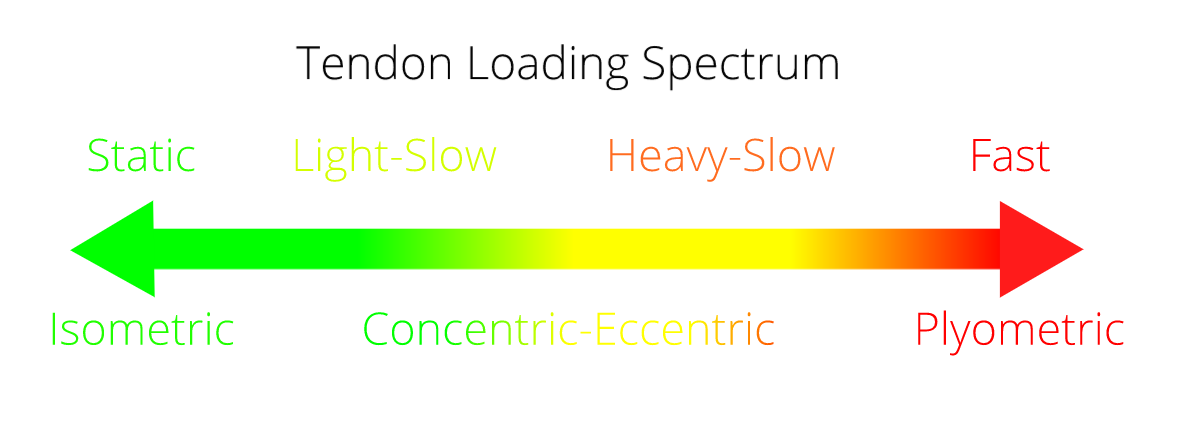
The tendon loading spectrum is a continuum going from very low load to very high load to help us grade the intensity of different types of load. If you have Achilles pain with running then your tendon is unable to tolerate the type of load that running puts on your Achilles tendon. Running puts a high plyometric (fast) type of load on your Achilles tendon. So we can say that your Achilles is unable to tolerate ‘fast loading’. However, what if you also have pain when you walk? Walking puts a ‘light-slow’ type of load on your Achilles tendon. So if you get pain with walking then your Achilles is unable to tolerate ‘light-slow’ loading.
In Part Two of this series I talked about how we need to determine where on my tendon loading spectrum you currently sit based on your symptoms. Once we know where you currently sit we can decide what type of loading program (i.e. what type of exercises) we need to start with. You do those loading exercises for a few weeks and then your tendon will start to adapt. As your tendon adapts to the loading you will find it can tolerate more intense loading. Then we increase the intensity of the loading exercises to stimulate further adaptation. In this way, you move from the low end of the tendon loading spectrum up to the high end. Once you get all the way to the top, your tendon will tolerate very intense loading without pain. Then you will be able to run as much as you like.
First of all, we need to decide where you currently sit on the tendon loading spectrum. For this purpose I’ve divided the loading program into four phases that are roughly based on some research by Silbernagel and colleagues (Silbernagel 2007). Based on your Achilles pain symptoms you can decide where you sit on the tendon loading spectrum and, therefore, which phase to start in.
- Painful during or after walking = Phase I
- Walking is pain free but running is painful immediately = Phase II
- You can run for more than 10 minutes but the tendon hurts afterwards (or the next day) = Phase III
- You can run as much as you want without pain = Phase IV
I talked about this in a recent podcast episode:
Phase I – Static Loading
If you have Achilles pain during or after walking then we can say that your Achilles tendon is unable to tolerate light-slow loading. So you would sit around the very lowest end of the tendon loading spectrum.
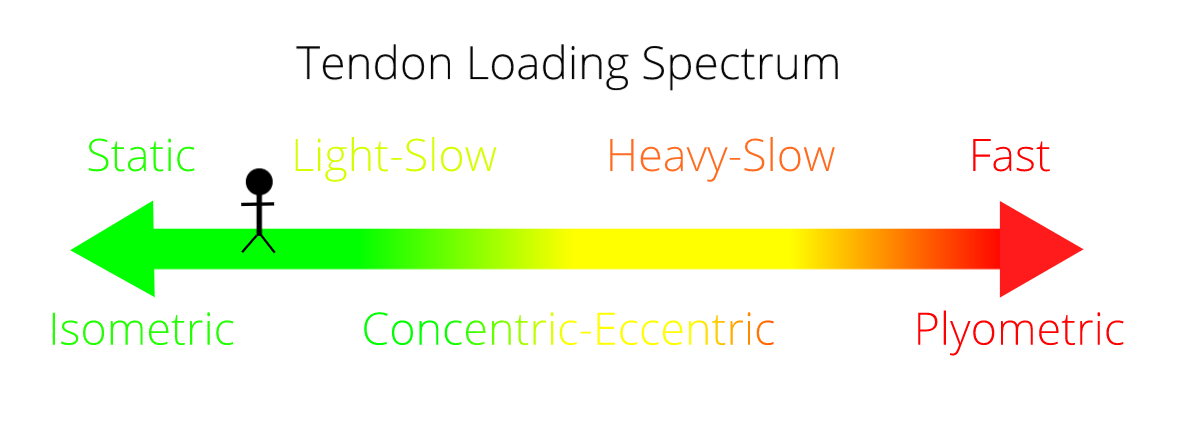
In phase I the goal is to build some very basic load tolerance in the tendon. We need to get the pain down a bit so we can actually start doing some real loading of the tendon. We can use isometric (static hold) exercises here as they have been shown to help to reduce tendon pain (Rio 2015). We are going to use simple calf raises for pretty much all of our Achilles tendon loading program. Calf raises are very boring but they load the Achilles very well so they will get the job done. In this early phase we are trying to reduce pain and get started. The exercises are relatively low load so you can often do them multiple times per day (depending on how you feel). Here’s an example of a fairly standard Achilles tendon loading program in phase I:
- Phase I – Static (x 1-5 per day)
- Begin this stage when the tendon is painful during or after walking
- Static Single Leg Calf Raise – 5 x 45 seconds hold
- Double Leg Calf Raise – 3 x 15 (straight knee – metronome at 20 bpm)
We use the metronome for external pacing for the double leg calf raise. If you download any metronome app you can set the beats per minute to 20. At 20 bpm you will hear a beep every three seconds. All you need to do is reach the top of the calf raise on one beep and the bottom of the calf raise on the next beep. Then you will be taking 3 seconds up and 3 seconds down. There are two reasons for this. The first is that it slows us down and increasing load tolerance in tendons seems to be very much related to something called time under tension. This basically means that if you rush through your sets the tendon will not be under load for very long. That will reduce the overall loading on the tendon and, therefore, the tendon will not strengthen as much in response. The second reason is that external pacing may help address some of the funky changes in the nervous system that occur as the result of tendinopathy (Rio 2016).
Let me emphasize here, this is not supposed to be a prescriptive program of exercises. What I hope to convey is that the key to rehabilitating your Achilles tendon is progressively increasing it’s load tolerance. You need to work out what it can tolerate, load it at that amount and then progressively increase the loading as the tendon adapts. You do not need to use these exact exercises. You can do your exercises every day or a few times a week. You can just do calf raises or you can use other exercises and exercise machines. The goal is to increase the load tolerance, how you do that is up to you.
Phase II – Light-Slow Loading
If you have Achilles pain with running but not with walking then we know that your Achilles tendon can not tolerate fast loading. We know you can tolerate light-slow loading but we don’t know if you can tolerate heavy-slow loading. So we’re going to drop you onto the tendon loading spectrum around here:
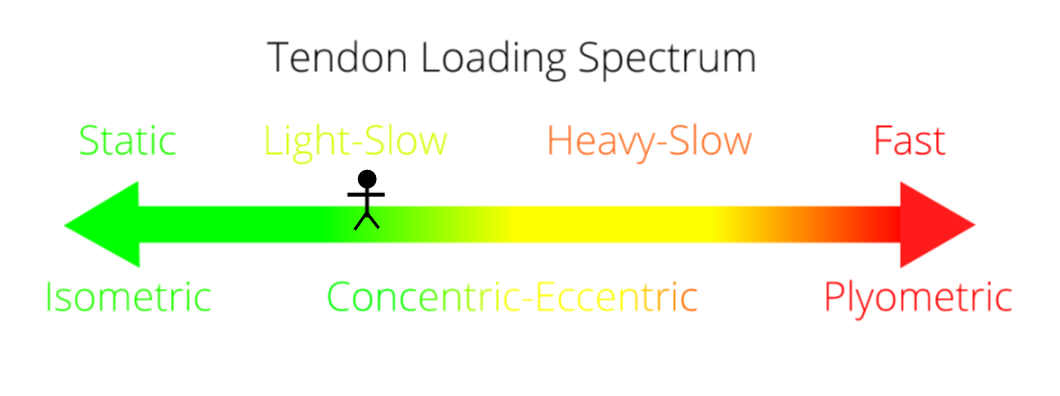
In phase II the goal is to increase the load tolerance of the Achilles tendon until it is able to tolerate fast loading. We do this by starting with relatively light loading exercises around bodyweight and then progressively increasing the load by adding weight. Since we are using calf raises as our primary means of loading the Achilles tendon we can start adding more weight by holding a dumbbell in our free hand or using a sturdy backpack filled with heavy stuff. If you have access to a gym then a smith machine and a seated calf raise machine are a couple of excellent ways to load the Achilles tendon. Here’s an example of a typical loading program I might give someone with Achilles tendinopathy in phase II:
- Phase II – Light-Slow (x3 per week)
- Begin this stage when you can walk pain free but running is painful immediately
- Single Leg Calf Raise (straight knee – metronome at 20 bpm) – 3 x 15
- Single Leg Calf Raise (bent knee – metronome at 20 bpm) – 3 x 15
You would continue the program for a few months, progressively adding more and more weight. This is a key point, the loading program you use needs to be progressive. That means the load is steadily increasing over time. This is what stimulates the adaptation in the tendon. Think of it like marathon training. You don’t start your marathon training at 70k per week. You start with around 35k a week and progressively increase the mileage to increase your tolerance to running. With our tendon loading program we are progressively increasing the loading in order to increase the tolerance of the tendon to running. Just like marathon training takes a long time, tendon training takes a long time. I always tell my clients to remember “tendons are slow, think months not weeks”.
Phase III – Heavy-Slow & Plyometric Loading
If you can run for more than 10 minutes but the tendon hurts afterwards (or the next day) then we know that your Achilles tendon can tolerate some fast loading, but not enough. Many runners find the tendon hurts more at the start of the run and then ‘warms up’ (i.e. the pain gets better as they run). Usually this is accompanied by increased pain after the run or the following morning. For these runners we can be pretty confident you can tolerate some heavy-slow loading so we’ll drop you on the tendon loading spectrum around here:
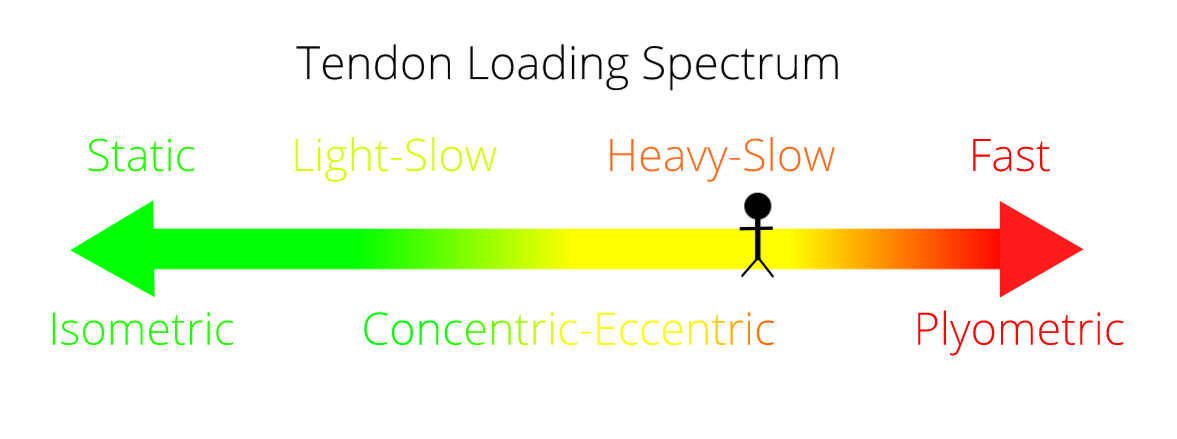
The goal in phase III is to increase the load tolerance of the Achilles tendon to fast loading. We want the Achilles tendon to be so resilient it can tolerate tons of fast loading without batting an eyelid. If we can do that the tendon will tolerate more and more running. Once the tolerance of your Achilles tendon exceeds the amount of running in your training program, you can consider yourself fully rehabilitated. You can now run as much as you want without pain. Phase III usually takes the longest (remember, “think months not weeks”). You are also going to need access to weights, so a gym membership is probably a good idea. You just need weights and a step though so get a cheap membership to a community gym if you hate gyms.
- Phase III – Heavy-Slow & Plyometric (x3 per week)
- Begin this stage when you can run for more than 10 minutes but the tendon hurts afterwards (or the next day)
- Use as much weight as you can for the loaded exercises
- Loaded Single Leg Calf Raise (straight knee – metronome at 20 bpm) – 3 x 15
- Loaded Single Leg Calf Raise (bent knee – metronome at 20 bpm) – 3 x 15
- Fast Single Leg Calf Raise (straight knee) – 3 x “to fatigue”
- Hopping on the spot – 3 x “to fatigue”
- Hopping back and forth – 3 x “to fatigue”
For the Bunny Hops and River Hops “to fatigue” means exactly what it sounds like. You keep going until you can’t do any more. Keep count and try and beat it on the next 2 sets.
Phase IV – Maintenance
Once you can run as much as you want without pain then you can consider your Achilles tendinopathy fully rehabilitated. Unfortunately, recurrence of Achilles tendinopathy is common and your risk of developing it on the other side could be as high as 41% (Paavola 2000). So we want to try and make sure your Achilles tendons on both sides are as strong and resilient as possible. I recommend anyone who has had trouble with Achilles tendinopathy in the past continue loading exercises 1-2 times per week as long as they continue running. Now, that might sound a bit annoying, but when you consider that strength training may reduce overall injury risk by up to 60% and improve running economy by as much as 8% you can see that there is a lot to gain from adding some strength training to your running training. It’s also worth remembering that the up to 50% of the forces experienced by the lower limb during running occur in the calf/ankle area, so extra strong calves are extra important! (Willy 2016).
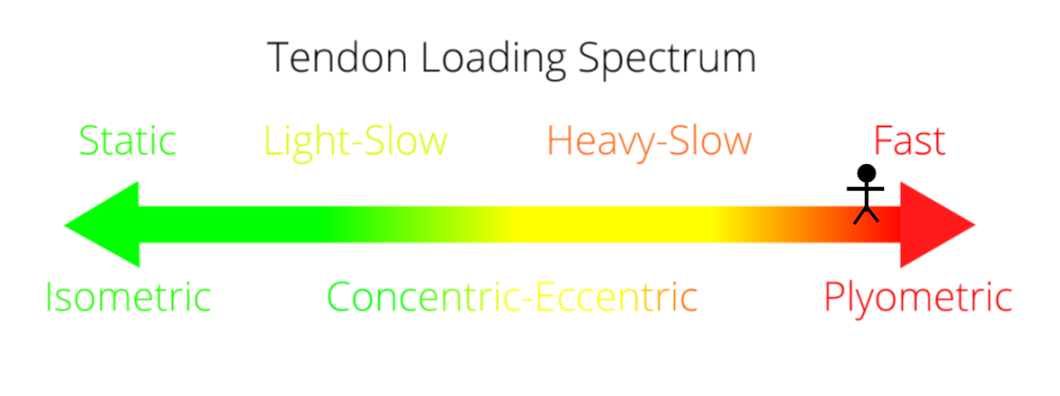
The goal in phase IV is to maintain all of the load tolerance you have built up in the Achilles tendon. As long as the load tolerance of your Achilles tendon exceeds the load placed upon it by your running training, you will not get any pain in your Achilles.
- Phase IV – Maintenance (x2 per week)
- Begin this stage when you can run as much as you want without pain
- Use as much weight as you can for the loaded exercise
- Loaded Single Leg Calf Raise (straight knee – metronome at 20 bpm) – 3 x 15
- Fast Single Leg Calf Raise (straight knee) – 3 x “to fatigue”
Should I Continue Running with Achilles Pain?
That’s a good question. If you consider that our goal here is to increase the load tolerance of the Achilles tendon by regularly loading it then we can just consider running another form of loading. Just the same as for our exercise program above, we want to load the tendon regularly, not too much, not too little. Load it the amount that it can tolerate, but not more. That means you can run the amount you can tolerate, but not more.
A really simple way to decide if the amount of running you are doing is okay is to just ask yourself “Is my pain getting worse week by week?”. If it is, you’re running too much, if it’s not then you can continue. We can also be a little more specific if you want to be sure. A tendon expert from Australia named Peter Malliares recommends using a kind of ‘painful test’ to evaluate your tendon. An easy example would be to hop up and down on the painful tendon 5 times and rate your pain on a scale of 1 to 10. You repeat the test the following day after each run. If your tendon pain on the ‘painful test’ increases then whatever you did the day before was too much (Malliares 2015).
Another group of researchers from Sweden looked at whether continuing activities that provoke Achilles tendon pain had a negative effect on Achilles tendon rehab. They took two groups and put them through a similar rehab program to the one I described above. The only difference is that one group had to avoid any activities that brought on their pain for the first 6 weeks (activities like running, sprinting, jumping). The other group was allowed to continue these activities as long as their pain did not exceed 5/10 during the activity or the next day. They found the two groups both improved significantly and there was little difference between them at 3, 6 and 12 months (Silbernagel 2007).
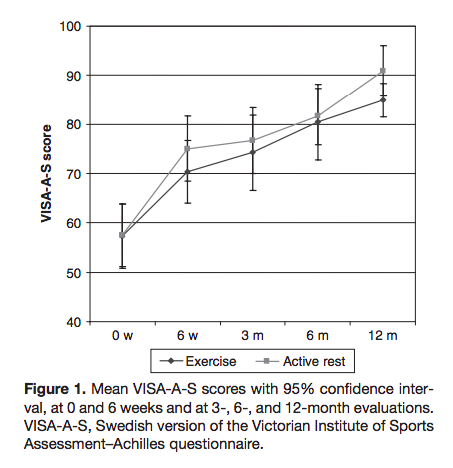
So the message here is that continuing to run doesn’t seem to have a negative impact on your rehab as long as the tendon pain is ‘stable’. That is to say, it’s not getting worse week by week and it doesn’t go above 5/10 during or after your runs.
Summary
Achilles pain with running takes a long time to fix and is prone to recurrence. They key to rehabilitation is to work out how much load your Achilles tendon can tolerate and then progressively increase that load tolerance over a period of months. You can continue running during your rehabilitation as long as your pain is ‘stable’. It’s very important that the loading program is progressive, meaning it’s getting progressively more and more difficult.
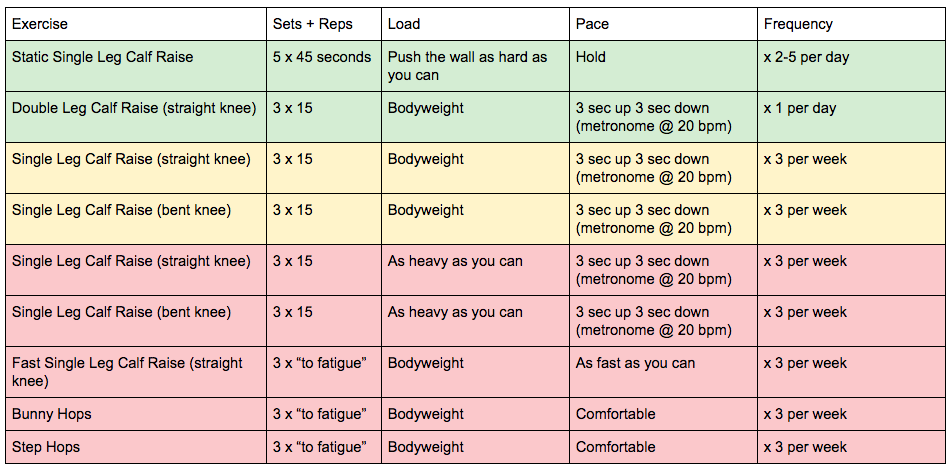
You can use the Tendon Loading Spectrum to work out how much load your Achilles tendon can tolerate based on your symptoms. This will tell you which phase of the rehab program to start in. I’ve summarized the 3 phases in the table below.
- Painful during or after walking = Phase I = Green
- Walking is pain free but running is painful immediately = Phase II = Yellow
- You can run for more than 10 minutes but the tendon hurts afterwards (or the next day) = Phase III = Red
- You can run as much as you want without pain = Phase IV (not in the table)
If you’re having trouble with your Achilles tendon, we can help get you back to pain-free training. Just click the button to book a call.